Each Illustrator document is, in essence, a complex connect the dots puzzle with some instructions on how to draw the line connecting them. The instructions also explain how to fill the object once it’s been drawn.
Strokes and Fills

Each shape or object you create in Illustrator is made up of the shape’s outline which Illustrator refers to as the PATH and the shapes’ FILL. You can change these by clicking on either the filled square (the fill) or the outlined square (the stroke) located near the bottom of the toolbar. Beneath the stroke of fill picker, you can choose one of three options, a solid color fill, a gradient or none which will make the stroke or fill invisible.
Working with basic shapes
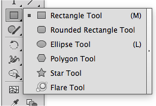
Many basic shapes can be built by Illustrator. Be default they will build the shape from the corner you click. If you’d like them to form from the center hold down the OPTION key. To keep them proportional hold down SHIFT key. You can move the shape while you’re creating it by pressing the SPACEBAR. With the Star and polygon tool pressing the UP ARROW will add points or sides, the DOWN ARROW will subtract points or sides. The UP and DOWN ARROW will add or subtract the amount of curve on the corner of rounded rectangles as well.
Moving objects forward or backward in a layer
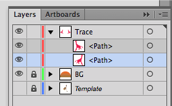
You will often need to move objects in front of or behind other shapes. You can move them using the COMMAND [ shortcut to move objects backward or COMMAND ] to move objects forward. Holding down SHIFT with these commands will move and object to the bottom or top of a layer.
Selecting an object or anchor points
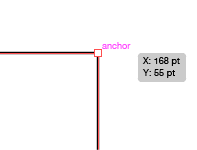
The dots that make up a shape are called anchor points in Illustrator. You select anchor points or a line (called a path in Illustrator) by using the white arrow, called the direct selection tool (keyboard shortcut A). You can select the entire object with the black arrow called the selection tool (keyboard shortcut V). Sometimes, when you are trying to select an anchor point, you may select the entire object, to avoid this click off the shape and then move your cursor over the path or anchor point until it is highlighted and click to select it.
Grouping objects

Often you will want to move more than one object at a time you can achieve this by selecting the objects you want to stick together and then grouping them by using the keyboard shortcut COMMAND G. You can ungroup object by pressing COMMAND SHIFT G. If you need to temporarily change a group double click on it to enter ISOLATION MODE. you can leave this mode at any time by double-clicking on something outside of the group.
Creating a shape with the Shape Builder Tool
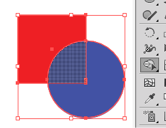
The Shape Builder Tool (keyboard shortcut SHIFT M) and be used to combine or subtract many selected shapes. To use this tool first you need to select all the objects you intend to use to create your shape. Then drag the shape builder tool across the shapes you want to combine or hold the OPTION key and click or drag over the shapes you want to subtract.
Working with gradients
Gradients are a blending of at least two colors in Illustrator. There are two types of gradients, Linear which is a blend from one side to another or Radial which blends colors from a center point out. These two options are chosen using the Gradient Palette usually located on the right toolbar.
Using the Gradient Palette
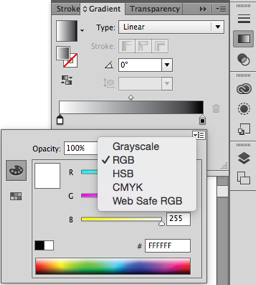
The Gradient Pallet has two main controls the Type drop-down menu which lets you select if you want a linear or radial gradient and the Gradient Slider which allows you to build your gradient. The slider defaults to two little color houses and a dot in the center. This dot is the center of the gradient, you can move it to either side to stretch or shorten the transition from one color to the next. You can change the color in the little houses that can double-click on them. By default these will be set to black and white; to use color click on the little menu that looks like three lines and a downward arrow and select RGB. To add more colors to a gradient click on the slider where you’d like to add it. To subtract a color click on its house and then drag it down off the timeline.
You can also use the Gradient Tool (shortcut G) and drag out a gradient. The gradient will always start with the color that’s at the left of the gradient slider and end with the color on the right. With a radial gradient, the color to the left of the slider will be at the center; the color to the right will be on the outside of the gradient.
